Getting Pally with AutoCAD Tool palettes [Tips & Tricks]
![Getting Pally with AutoCAD Tool palettes [Tips & Tricks]](http://cadsetterout.com/wp-content/uploads/2017/10/Getting-Pally-with-AutoCAD-Tool-palettes-Tips-Tricks-300x300.png)
Getting Pally with AutoCAD Tool palettes [Tips & Tricks]
If you would like to guest post on CSO, please check out the posting guidelines here:
https://cadsetterout.com/write-for-cadsetterout/
Getting Pally With Tool Palettes
Two of my favourite AutoCAD tips are adding leaders and hatch patterns to the Tool Palettes. Once on the palette, they can be dragged into any drawing whenever they are needed.
In a world where deadlines and profit margins are shrinking, “Increased Productivity” is something we all strive for. There is no doubt in my mind that these two tips have increased my productivity, so why not give it a go.
To locate the tool palettes click ‘View’ on the ribbon and then click on ‘Tool Palettes’ (Fig 1).
The first thing you will notice is that the Tool Palettes come with a lot of pre-loaded content aimed at multiple disciplines.
Perhaps you have looked at them before, seen a load of stuff that is of no use to you, clicked on that little cross in the top right corner and promptly forgotten about them?
Maybe now is the time for you to make the tool palettes work for you.
Let’s start by clearing away any of that pre-loaded content that you don’t need.
- You can right click on any tool palette content that you don’t need and delete it.
- You can right click on the tool palette tabs and delete whole palette if necessary.
- You can add and rename new palettes by right clicking on the palette tabs.
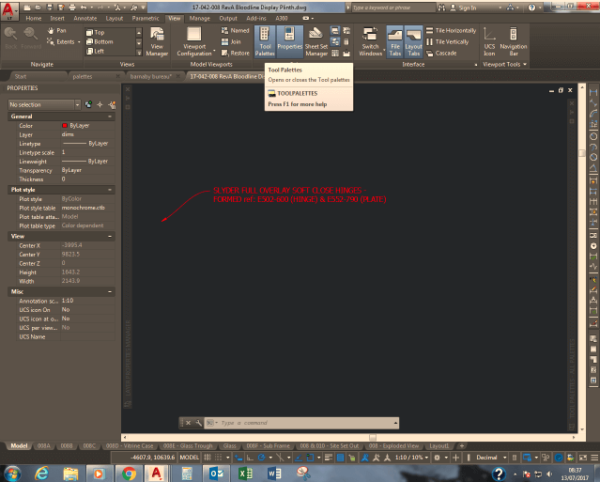
Fig 1 Opening AutoCAD’s tool palettes
The palettes have an Auto-Hide button at the top, and I tend to have this turned on so I can maximise the screen drawing area.
When working on a drawing you simply move your cursor over the tool palette bar and the palettes will fly out ready to drag content into your drawing.
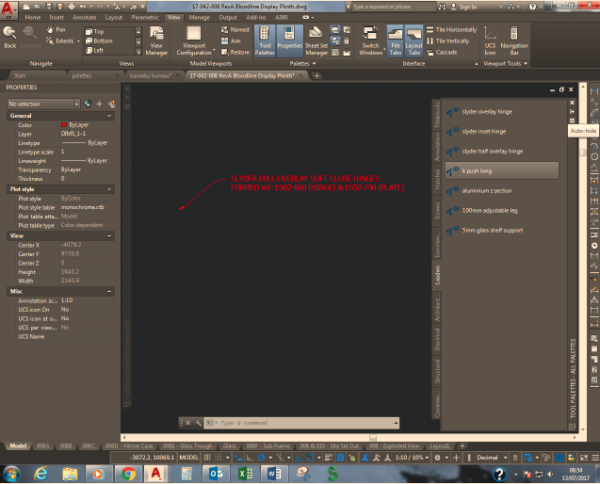
Fig 2 Saving AutoCAD Leader Lines to a Tool Palettes
To Add a Leader Note to an AutoCAD Tool Palette
Before you drag a leader onto the tool palette, it’s a good idea to switch the Auto-Hide button off (Fig 2), so that the tool palette is constantly visible (you can switch it back on when you are finished).
Now type out your leader and make sure it is on the correct layer. It doesn’t matter what annotative scale you use when dragging the leader onto the tool palette.
Whenever you drag the leader into your future drawings, it will appear on screen at whatever the current annotative scale is set to, regardless of the annotation scale that the leader was created with.
To add your leader to the tool palette, left click on the leader text to bring up the grips, then, using the RIGHT mouse button, click on the grip and drag the leader onto the tool palette (Fig 3).
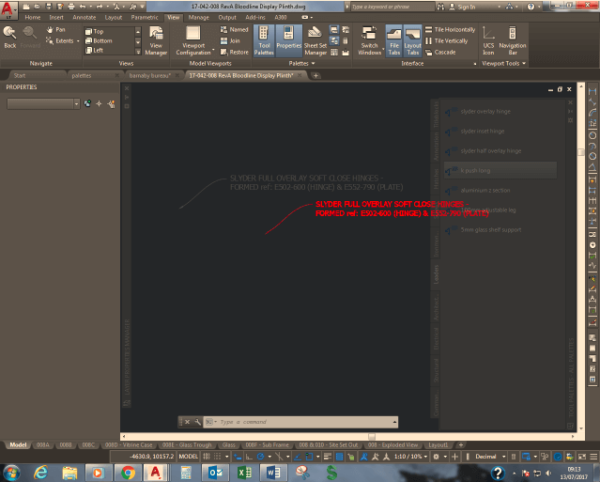
Fig 3 Right click and drag an AutoCAD leader line onto a Tool Palette
All leaders that you add to the palette will appear with the generic ‘Multileader’ name.
Obviously numerous leaders on the palette all called ‘Multileader’ isn’t going to improve anyone’s productivity!
The final step is to right click on the leader and select ‘Rename’ (Fig 4) and type in something that reflects the content of the leader – in this example I will name the leader ‘Slyder Overlay Hinge’.
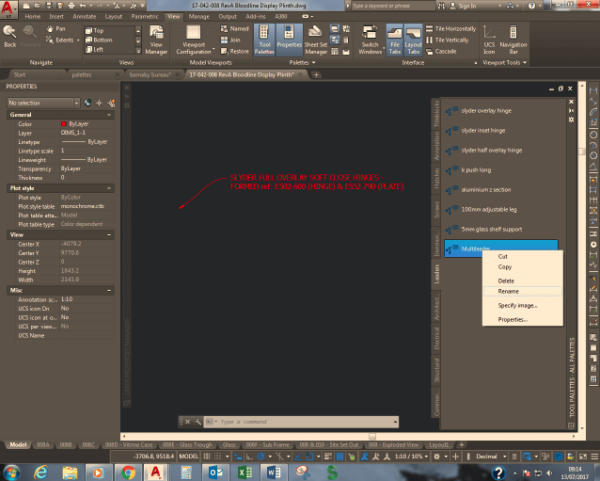
Fig 4 Renaming a tool on an AutoCAD tool Palette
I’m not suggesting you spend hours typing up leaders and dragging them onto the tool palette.
If you get into the habit of dragging commonly used leaders onto your palette every time you add one to a drawing, you will quickly build up a list of commonly used leaders that can be dragged into any drawing.
In addition the leaders will be annotative, and be on the correct layer – It’s a great time saver.
Hatches
If like me, you use various hatch patterns of differing angles and scales to identify the materials you work with, you might be interested to know that you can add hatch patterns to the tool palettes using the same method as adding leaders.
When adding hatch patterns simply draw a square and hatch it with the hatch pattern you want, set the hatch pattern scale and angle, finally, add the hatch to your hatch layer.
Now, just as you did with the leaders, click on the hatch pattern to bring up the grip, and, using the RIGHT mouse button, drag the hatch pattern onto the hatch palette.
Again, you will need to name the hatch something that is easily identifiable, so right click on the hatch thumbnail, select rename, and name it something meaningful.
Fig 5 shows my hatch tool palette. You will notice that the hatch thumbnails do not display the name that you give them, but the thumbnail reflects the hatch pattern and the hatch angle that is saved. This makes navigating to the right hatch is very easy.
To reveal the hatch name simply move the cursor over the thumbnail and the name will be displayed. In the example below, you can see that I have named this hatch ANSI37 (3) MDF.
The first part of the name identifies the hatch pattern used, the number in brackets is the scale of the hatch pattern (I use various scales of the same hatch patterns, so this helps) and the final part of the name identifies the material that I use the hatch pattern for, in this case MDF.
I have found this method of labelling the hatches on the palette useful when encouraging the use of hatch standards to new members of the drawing office, but the name can be anything that will be easily recognised by you.
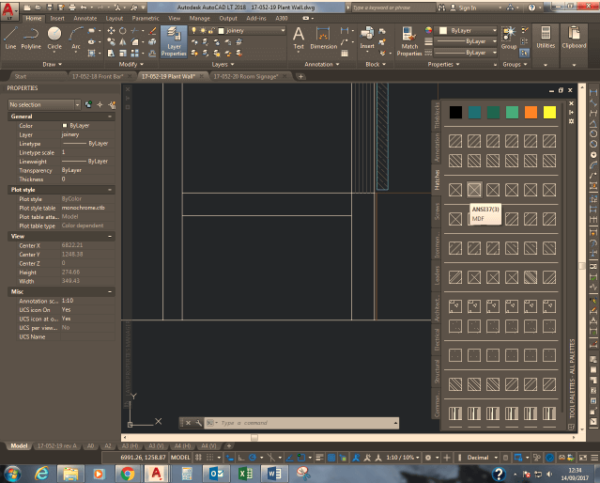
Fig 5 An AutoCAD tool Palette of Hatches
This process will need to be repeated for each hatch pattern and scale that you use.
Admittedly, this can seem a bit daunting – especially if you use a lot of hatch patterns.
Whether you bite the bullet and spend an hour or two adding all of your hatch patterns to the palette, or whether you add a hatch pattern to the palette each time you use one, having all of your hatch patterns on the palette ready to be dragged into your drawing will pay dividends.
Organising your Tool Palettes
Finally, remember that randomness is the enemy of productivity, so organising the content on your palettes is a great way to help improve efficiency.
As you build up content on your palettes, you can reorder the thumbnails by clicking and dragging them to a new position, so try and group similar items together so they are easy to find.
You can add lines between groups of thumbnails by right clicking on the palette and selecting ‘Add Separator’ (see the hatch thumbnails in Fig 5).
You can also rearrange the order of the palette tabs by right clicking on the palette name and clicking move up or move down.
Further reading
Thanks Mike :)
To learn how to create server based AutoCAD tool palettes which standardise CAD output across your whole team, please watch this free recording of my Autodesk University class:
https://cadsetterout.com/personal-posts/cadsetterout-at-autodesk-university-2015-autocad/

Mike McDonnell-Brookes is a cabinet maker by trade, but has spent the last 18 years of his career working in the drawing office, initially as the sole AutoCAD draughtsman, and then managing a small team. In early 2015 he initiated and oversaw the switch from AutoCAD to Inventor, Woodwork for Inventor and Vault Basic, a challenging, but ultimately rewarding piece of work.
In May 2017, following a 31 year career with the same company, Mike decided it was time to move on and seek a new challenge…
Mike is married with two children and enjoys camping and hill walking.
Hi Paul,
Thanks for taking the time to read the post and to leave a comment. Glad you found the tip useful. All the best, Mike
Thanks for the hatch tip. I never would have thought of putting it in the tool palette for I too am lazy!