In a spin with AutoCAD Blocks and Tool Palettes [Tips & Tricks]
![In a spin with AutoCAD Blocks and Tool Palettes [Tips & Tricks]](http://cadsetterout.com/wp-content/uploads/2017/10/In-a-spin-with-AutoCAD-Blocks-and-Tool-Palettes-Tips-Tricks-300x300.png) Thanks very much to Mike McDonell-Brookes for this second AutoCAD Tool Palette tip. You can read Mikes previous tips for adding leader lines and hatches to AutoCAD tool Palettes here:
Thanks very much to Mike McDonell-Brookes for this second AutoCAD Tool Palette tip. You can read Mikes previous tips for adding leader lines and hatches to AutoCAD tool Palettes here:
https://cadsetterout.com/autocad-tutorials/pally-with-autocad-tool-palettes/
Would you like to write a guest post for the CadSetterOut? Find out how here:
Write for Cadsetterout
In a Spin with Palettes
At the risk of appearing fixated with the AutoCAD tool palettes…. and I am fixated with AutoCAD tool palettes, my second offering to the CAD Setter Out blog also concentrates on the tool palettes.
But, whereas my first tip on adding leaders and hatches to the tool palettes was a bit lengthy, this second tip is short and sweet :)
If you use the tool palettes to drag screws, bolts, hinges or any other items of ironmongery into your drawings, you will find that the block is placed in the orientation in which it was created.
So, for example, a screw that was created horizontally facing left, will be horizontal and facing left when it is dragged into the drawing.
This means that, more often than not, you will need to rotate or mirror the block once placed in your drawing, so it’s in the correct orientation.
While rotating or mirroring a block may not be the biggest inconvenience, there is a quick and easy way to make any item you drag from the tool palettes prompt you to rotate it before you place it in the drawing.
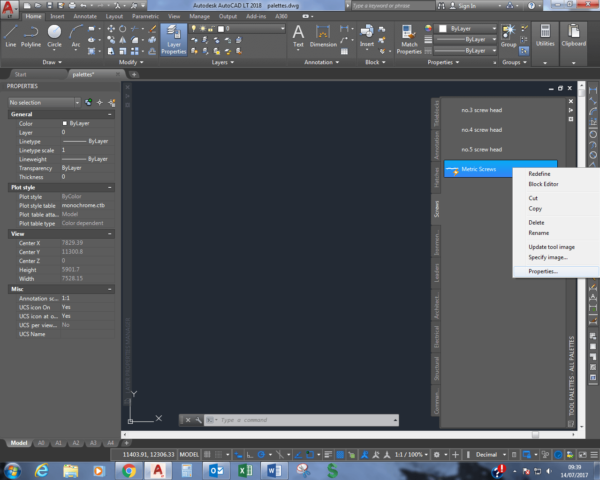
01 Editing block properties on an AutoCAD Tool Palette
Move to the item on the palette that you want to rotate, right click and select ‘Properties’ from the fly out menu (Fig 1).
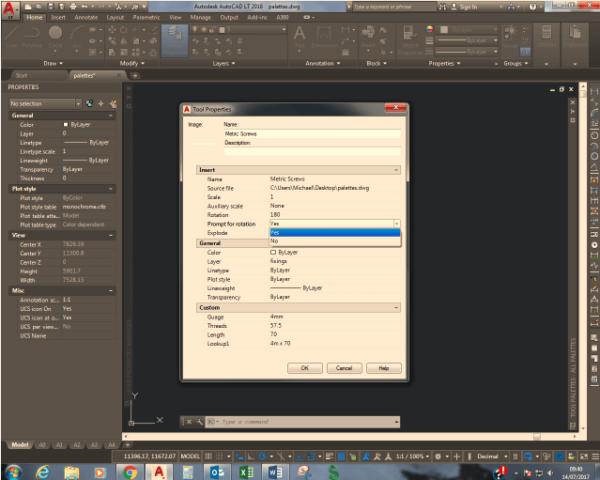
02 AutoCAD tool palette Tool properties
On the properties dialogue box click on the ‘Prompt for Rotation’ option and select ‘Yes’ from the drop down list, and that’s it… (Fig 2)
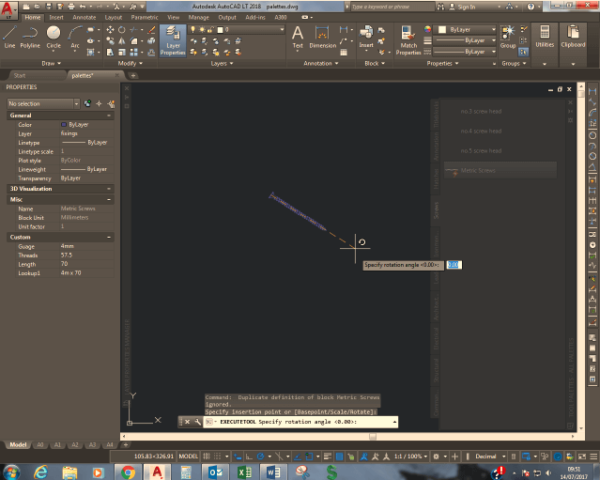
03 Insert block from AutoCAD Tool Palette with rotation
Now when you drag the item into your drawing and click to select the insertion point, you can either input a rotation angle, use the polar tracking angles or free rotate the block to any orientation you need.
A second click of the left mouse button will accept the orientation and place the block in the drawing.
Further reading
Thanks Mike :)
To learn how to create server based AutoCAD tool palettes which standardise CAD output across your whole team, please watch this free recording of my Autodesk University class:
https://cadsetterout.com/personal-posts/cadsetterout-at-autodesk-university-2015-autocad/

Mike McDonnell-Brookes is a cabinet maker by trade, but has spent the last 18 years of his career working in the drawing office, initially as the sole AutoCAD draughtsman, and then managing a small team. In early 2015 he initiated and oversaw the switch from AutoCAD to Inventor, Woodwork for Inventor and Vault Basic, a challenging, but ultimately rewarding piece of work.
In May 2017, following a 31 year career with the same company, Mike decided it was time to move on and seek a new challenge…
Mike is married with two children and enjoys camping and hill walking.
Thanks mike for the post, really appreciated your efforts for explaining the process in detail. For any further query are you open to answer?
Hi Autocad Classes in Vadodara, do you have a specific question about the article?